Your challenge is to use the Neo4j Data Importer to upload Northwind CSV files, model your data, and create nodes.
To complete this challenge:
-
Upload the Northwind CSV files to Data Importer
-
Create node labels for Customer, Order, Product, Category, Supplier, Employee, and Shipper
-
Map CSV columns to node properties and set unique identifiers
-
Run the import to create nodes in your database

Choosing Your Import Environment
Access the Data Importer via AuraDB:
-
Log in to Neo4j Aura at console.neo4j.io/graphacademy
-
Open your AuraDB instance
-
Click Import in the left sidebar
The Data Importer opens directly connected to your Aura database.
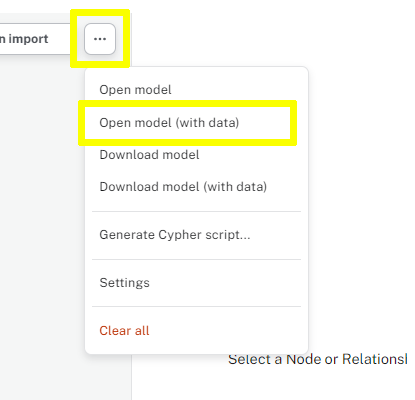
Need to clear an existing model?
If you have an existing data importer model, you can clear it by selecting the Clear all option from the menu ….

Creating Nodes
Create nodes with Data Importer:
-
Add a data source (CSV file)
-
Create a node label
-
Map properties from the CSV file to the node
-
Set a unique identifier
-
Run the import
Step 1: Add a Data Source
Data Importer can import data from CSV (Comma Separated Values) and TSV (Tab Separated Values) files.
-
Click New data source in the Files panel
-
Select CSV as the data source type

-
Drag and drop your CSV file or click to browse

-
Once uploaded, the file contents will be displayed

For this course, you can use the Northwind CSV files from: https://github.com/neo4j-graph-examples/northwind/tree/main/import
Step 2: Create a Node Label
Start with a blank canvas:

Create new nodes:
-
Click Add node label on the canvas
-
Enter the label name such as
Customer,Product, orOrder -
In the Definition panel, select the corresponding CSV file
-
Click Map from table to map CSV columns to node properties
-
Select the columns you want to import and click Confirm

Editing properties
You can edit property names and types by clicking the pencil icon next to each property. This allows you to:
-
Rename columns to follow Neo4j naming conventions, for example
customer_idtocustomerID -
Change data types: String, Integer, Float, Boolean, Date
-
Remove columns you do not need
Step 3: Set a Unique Identifier
Every node type needs a unique identifier to:
-
Prevent duplicate nodes during import
-
Enable efficient lookups
-
Create relationships between nodes
Click the key icon next to the ID property to set it as the unique identifier.

Data Importer creates a Name for each property and assigns a Type based on the data in the file. The Column refers to the field in the CSV file.
When you set a unique identifier, Data Importer automatically creates a unique constraint and index for that property. This enables MERGE semantics on re-import and faster lookups.
Constraints and Indexes in Data Importer
You can view and manage constraints and indexes from the Data Importer UI:
-
Select a node in your model
-
Switch to the Constraints & Indexes tab in the Definition panel
-
The unique ID property creates a constraint and index automatically
-
To add an extra index for query performance (e.g. on
companyNamefor Customer), click the + button under Indexes, select the property, and run the import

Adding indexes improves query performance for filters and lookups. For example, an index on orderDate speeds up date-range queries on Order nodes.
Step 4: Run the Import
Once your model is complete:
-
Click Run import

-
Wait for the import to complete. You will see a summary of the results:

-
Click Close to return to Data Importer
Step 5: Save Your Model
After a successful import:
-
Give your data model a name such as "Northwind Model"
-
Click Save

Reusing your model
Saved models can be reused for future imports. You can also download your model using the … menu > Download model (with data) to back it up or share with colleagues.
Verify the Import
Verify your data in the Query tool:
// Count nodes by label
MATCH (n)
RETURN labels(n)[0] AS label, COUNT(*) AS count
ORDER BY count DESC// View sample data
MATCH (c:Customer) RETURN c LIMIT 10
Common Import Mistakes to Avoid
Common mistakes to avoid:
Mistake 1: Not setting a unique identifier
Problem: Importing nodes without a unique ID property.
Consequence: * Cannot use MERGE to update existing nodes * May create duplicate nodes on re-import * Difficult to create relationships later
Solution: Always set a unique identifier for each node type before importing.
Mistake 2: Importing foreign keys as properties
Problem: Keeping foreign key columns as node properties.
Example: Creating a Customer node with customerID AND keeping order_id as a property.
Reality: Foreign keys should become relationships, not properties. The order_id on a customer does not make sense - instead, create a relationship from Customer to Order.
Mistake 3: Wrong data types
Problem: Importing all data as strings when other types are appropriate.
Examples: * Dates stored as strings instead of Date type * Numbers stored as strings instead of Integer/Float * Booleans stored as "true"/"false" strings
Solution: Check and set appropriate data types in Data Importer or convert during Cypher import.
Mistake 4: Creating nodes before constraints
Problem: Importing nodes first, then trying to add constraints.
Consequence: If duplicate data exists, constraint creation will fail.
Solution: Always create constraints BEFORE importing data:
CREATE CONSTRAINT customer_id IF NOT EXISTS
FOR (c:Customer) REQUIRE c.customerID IS UNIQUE
Backup your work
Data Importer saves changes automatically, but you can download your import model and data by selecting the Download model (with data) option from the menu ….

You can restore your model using the Open model (with data) option and selecting the downloaded file.
Need to download a working solution?
This Data Importer model, person-import.zip, contains a working solution for this exercise.
Download the model and open it using the Open model (with data) button in the … menu.
Note that this will replace your existing model.
Creating Nodes with Data Importer
What must you do to create nodes using Data Importer? (Select all that apply)
-
✓ Upload a source file
-
✓ Create a node label
-
✓ Set a unique identifier for each node
-
❏ Update at least one property name
Hint
You can modify a node’s property names, although it is not mandatory.
Solution
To create nodes using Data Importer, you must:
-
Upload a source file
-
Create a node label
-
Set a unique identifier for each node.
You do not have to update any property names.